State of the Desk 2021
Desk overview
Since the beginning of the coronavirus lock downs in March 2020, I’ve been slowly adding on to my desk. I was happy with my home office desk before lock down started, but as I worked from home I wanted a couple more features. I added another monitor and stepped up my video call quality.
Before Lockdown
I have been building out my desk for quite a while. Here is a list of what I had before lock down started:
- Maple Butcher Block (30"x60")
- 3 Monitors
- 2x Asus PB278q (27" 2560x1440)
- 1x ViewSonic VP3268-4K (32" 3840x2160)
- Individual gas-spring monitor arms for all monitors
- Colors calibrated to match using X-Rite ColorMunki Display
- Akitio Node Pro External GPU
- Akitio Thunder3 Dock Pro with 10GbE
- Micca Origen G2 USB DAC/Amp
- Logitech C920
- Kira Mechanical Keyboard with Hako True Switches
- Logitech MX Master
- Apple Magic Mouse 2
Updates
I upgraded a couple of different pieces on my desk since the beginning of the Corona Virus lock downs. The upgrades this year focused on audio upgrades and video conferencing.
Audio
I upgraded my audio set up. I had been thinking of getting a nicer headphone DAC/Amp and something that would support balanced audio output. I wanted to try out a balanced system to take full advantage of my Sennheiser headphones and JBL monitors. I ended up buying the Topping DX7 Pro DAC which should last me quite a few years. It supports both headphones and two individual sets of outputs, XLR and RCA.
I also bought another set of headphones, Hifiman Sundara, and bought balanced cables for both sets of headphones. I regularly switch between both sets of headphones, and I love the ability to have different listening experiences. I found myself using a pair of AirPod pretty frequently for quick, comfortable video and audio calls, and I wanted to try out the AirPods Pro. I really like the way they sound and fit in my ears, and I use them a couple times a week for walking around the house on calls, and listening to podcasts out and about.
I built a 10" subwoofer using a kit from Parts Express to fill in the low end when using my speakers. This took a couple of weeks, but it really makes a difference when listening to music.
Video Conferencing
I personally don’t like listening to terrible audio streams or looking at grainy camera feeds. I upgraded my camera to a Sony a6400 with a Sigma 16mm f/1.4 lens. To get this camera feed into my system, I bought one of the only capture cards I could find, a ClonerAlliance Flink 4KP Plus 1080p@60fps USB video capture card with 4K@60fps passthrough. I really didn’t need all of these features, but when I bought it, it was the only thing available. It wasn’t very stable with macOS, and I ended up getting an Elgato CamLink 4K when it came back into stock. I also added two video lights to have nice and even light at night.
On the microphone front, I started to use my Zoom H1 HandyMic with a generic lavalier mic for the first couple of months. This was always a pain, and I wanted something easier and nicer. I initially added a Deity V-Mic D3 Pro mounted on top of my new Sony camera, but I didn’t like that I had to turn the camera on for the microphone to work. I then routed the microphone cable down directly to the ClonerAlliance capture card while I was using that, but I was having lots of issues with it. I eventually ended up getting a completely separate microphone solution.
I bought a Focusrite Scarlett 2i2 USB audio interface and Diety S Mic 2 XLR shotgun microphone. I also moved the microphone off of the top of the camera onto a boom so that it would be just outside of the camera frame and very close to my mouth. While the Focusrite Scarlett preamp has enough gain to get signal out of the S Mic, it was cranked and there was noticeable noise. I picked up a FetHead Phantom 18dB inline preamp and I was able to turn down the gain on the Focusrite.
Monitors and Arms
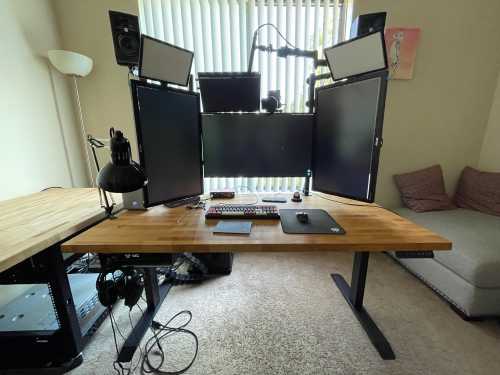
I added a 4th monitor to act as a dedicated chat and media screen. I found the cheapest 17" IPS portable monitor that had VESA mounting holes. The panel has terrible colors with only about 80% coverage of Adobe RGB. When I tried to calibrate it, the calibrated profile looked significantly worse than the out of the box profile.
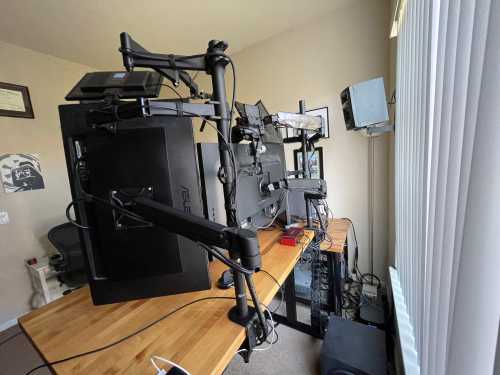
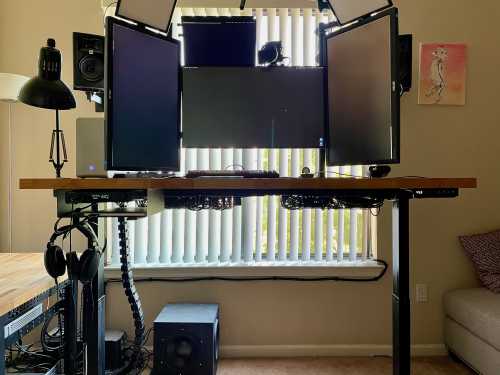
When I added the 4th monitor, I also reworked the monitor arm situation. Instead of having each monitor on a separate desk clamp, I got two tall monitor poles and moved all of the arms to be mounted to these poles. I also mounted the video lights, camera, and microphone to the poles.
Desk
I ended up building another desk with a 30"x72" maple butcher block to give me more space. This desk isn’t motorized, but I did need to get adjustable legs. Underneath this desk is my 12u rack, and rollable desk drawers. I’ll talk more about my rack and home lab in a later post.
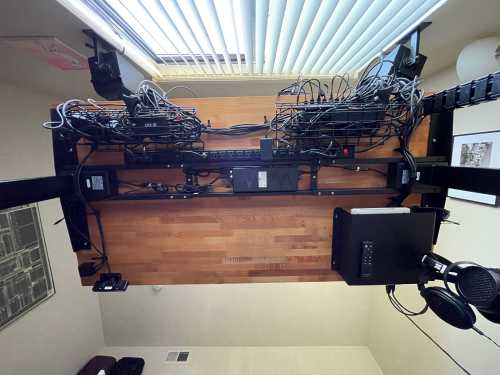
I added an under-desk shelf so that I can put my laptop somewhere other than on top of the desk. All the cables are routed underneath the desk, and only two cables are needed to power the whole desk, a Thunderbolt 3 cable, and a USB C cable. In this same place, above the laptop, I also mounted the Topping DX7 Pro. This also moved more cables and peripherals off my desk.
After I upgraded to CamLink 4K, I wanted to still do something with my ClonerAlliance device. I routed an HDMI port to the side of my desk so that I can plug something in, like my Nintendo Switch and use it on my main monitor. I can also capture the input and use it for something else, like streaming. I also added a PoE capable RJ45 port in the same place for ease of use. I have a couple of PoE devices that I want to be able to test at my desk without needing to dig out an injector. It is very nice being able to plug in devices with a dedicated port built into my desk.
Current State
- Desk
- Displays
- 2x Asus PB278q (27" 2560x1440)
- 1x ViewSonic VP3268-4K (32" 3840x2160)
- 1x Generic Portable Monitor (17" 1920x1080)
- Individual gas-spring monitor arms for all monitors
- Colors calibrated to match using X-Rite ColorMunki Display
- Dock
- Akitio Thunder3 Dock Pro with 10GbE
- Akitio Node Pro External GPU with AMD Radeon RX 580 GPU
- Audio
- Video Conferencing
- Peripherals
- Kira Mechanical Keyboard with Hako True Switches
- Logitech MX Master
- Apple Magic Mouse 2
- Apple Magic Trackpad 2
Pictures


